A direction for your next space
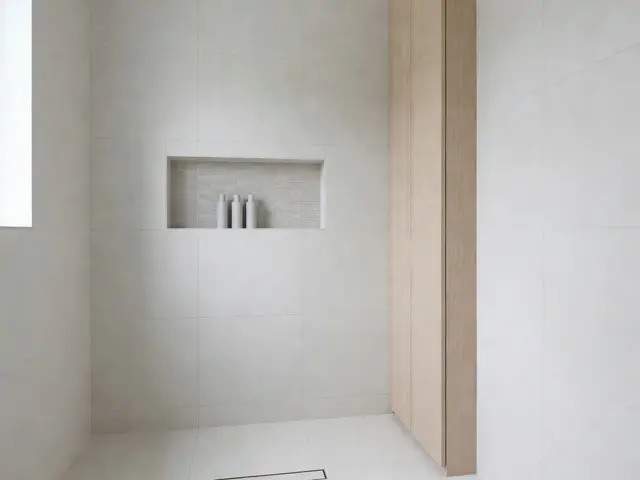
Minimalist Bathroom with Tile Niche
About this design
This minimalist bathroom demonstrates how a simple recessed niche can add function without visual clutter. The shower area features large format pale gray tiles with tight grout lines, creating a clean backdrop for a single rectangular wall niche. The storage cutout holds three white bottles in a row. Pale oak or natural wood paneling frames the wet zone on one side, while crisp white walls define the remaining surfaces. A low profile linear drain sits flush with the white shower floor.
Design this look with your photo ↗Your room photo + this reference. Review the studio allowance before generating.
What stands out
- The horizontal niche cuts directly into the tiled wall at a comfortable reach height, providing bottle storage without protruding hardware or shelving that would break the flat plane.
- Large format tiles in a soft gray tone cover the shower wall with minimal grout lines, reducing visual interruption and making the small space feel more expansive and calm.
- Pale wood paneling defines the shower boundary without a traditional glass enclosure, adding warmth through natural grain while maintaining the uncluttered aesthetic.
- The white linear drain sits nearly invisible against the matching floor surface, eliminating the need for a traditional center drain that would create a focal point.
Make it work in your space
In a smaller shower, reduce the niche to a single vertical orientation rather than horizontal to save wall space while still holding essentials. Skip the wood paneling if budget is tight and simply paint all walls white, then add warmth with wood bath accessories outside the wet zone. For a prefab shower base, the linear drain may not be possible, but you can still recess a niche into the wall during installation. Keep the large format tile on at least the main wall to preserve the uncluttered look even in a compact footprint.
Plan niche size around actual bottles and keep waterproofing continuous.
Materials and finishes
- Large format wall tile
- Choose tiles at least twelve by twenty-four inches to minimize grout lines. Matte finishes in pale gray or white hide water spots better than high gloss.
- Recessed shower niche
- Frame the niche during wall construction before tiling. Waterproof the interior completely and slope the bottom slightly forward so water drains out rather than pooling.
- Linear shower drain
- Position the drain along one edge rather than center. Confirm the floor slopes correctly toward it, typically one quarter inch per foot for proper drainage.
- Light wood wall paneling
- Select water-resistant species like white oak or treated wood rated for wet areas. Apply proper sealant to all edges and confirm ventilation prevents moisture buildup behind panels.
- Thin grout lines
- Use rectified tiles with precision edges to achieve tight grout spacing. Light gray grout minimizes contrast and stays cleaner looking than pure white in wet environments.
More Minimalist Bathroom Ideas
Your questions, answered
How do you waterproof a recessed shower niche in a tiled wall?
The niche must be framed and waterproofed during wall construction before any tile goes up. Apply waterproof membrane across all interior niche surfaces, wrapping corners and edges. Extend the membrane at least six inches beyond the niche opening onto the surrounding wall. Slope the niche bottom toward the shower by at least five degrees so water runs out. Use matching tile inside and seal all edges with proper grout and caulk rated for wet areas.
How do I try this look in my own space?
Choose Design this look and upload your own photo in the studio. This concept is loaded separately as a reference, and its design direction is included in the editable brief. Review your options before generating.
Can I buy the exact furniture and materials shown?
This is an AI-generated concept, not a catalog of real products. Use the image to compare shapes, colors, and materials, then verify dimensions and finishes with actual suppliers.